Hello fellow traders and enthusiasts! Today, we’ll explore one of the most powerful features of TradingView – custom alerts. Custom alerts can significantly enhance your trading experience by notifying you of specific market conditions and opportunities. In this blog post, we’ll walk you through the process of creating a custom alert in TradingView, covering everything from finding the alert icon to setting up the right conditions and notification options.
Step 1: Finding the Alert Icon in the Toolbar
To start creating a custom alert, first, open TradingView and navigate to the chart you want to set the alert for. Once your chart is open, look for the “Alert” icon in the top toolbar. It usually appears as a small bell-shaped icon. Click on the icon to open the alert creation dialogue box.
Step 2: Setting the Conditions Based on Chosen Indicators and Timeframe
After clicking on the “Alert” icon, a window will pop up, allowing you to customize your alert. Here’s how to set the conditions:
a. Choose the Indicator: Select the indicator you want to base your alert on. TradingView offers a wide range of indicators such as Moving Averages, RSI, MACD, Bollinger Bands, and more. You can choose from the available list or create a custom indicator using Pine Script.
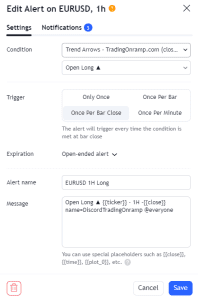
b. Define the Criteria:
Depending on your trading strategy, set the desired conditions for the chosen indicator. For example, if you’re using the Moving Average indicator, you may want to set an alert when the price crosses above or below a specific moving average.
c. Set the Timeframe:
Indicate the timeframe for your alert. You can choose from various timeframes like 1-minute, 5-minute, 1-hour, or even daily, depending on your trading preferences.
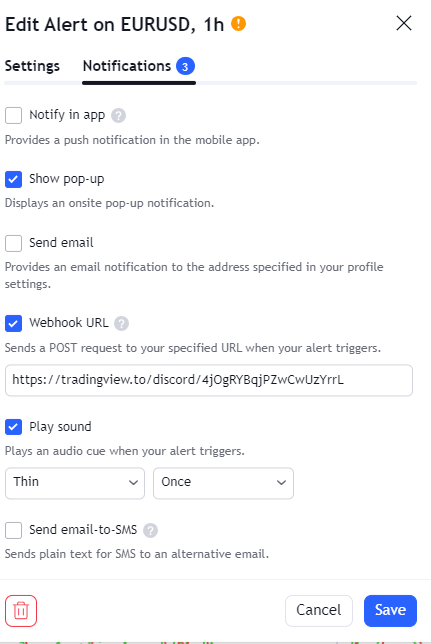
Step 3: Alert Notification Options
TradingView provides several notification options to ensure you never miss a potential trading opportunity. Here are some common notification methods:
a. Pop-up: A pop-up notification will appear on your TradingView interface when the alert condition is met. This is particularly useful if you are actively monitoring the charts.
b. Email: With this option enabled, TradingView will send an email to your registered email address when the alert is triggered. It’s an excellent way to stay updated on your trades even when you’re away from the platform.
c. SMS: For urgent alerts, you can set up SMS notifications. Please note that this service might have associated charges depending on your region and cellular provider.
Step 4: Save and Monitor Your Alerts
Once you’ve set up your custom alert conditions and notification preferences, click on the “Create” or “Save” button to activate the alert. Your alert will now be active and will trigger whenever the specified conditions are met.
Remember, custom alerts are not set in stone; you can modify or delete them at any time. Additionally, you can create multiple alerts with different indicators, timeframes, and notification settings to suit various trading strategies.
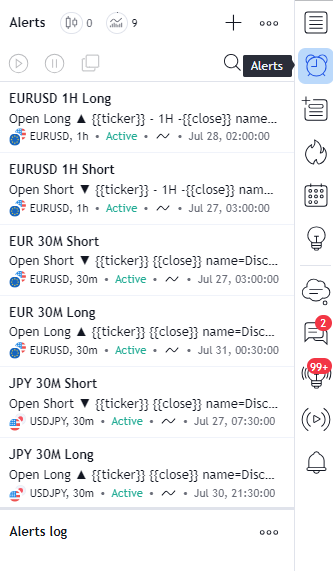
Step 5: Utilizing the Alert Logs Section
TradingView also provides an invaluable feature called the “Alert Logs” section. This section keeps a record of all triggered alerts, providing you with a historical overview of the alerts that were activated and when they occurred. Access the “Alert Logs” section by clicking on the clock icon located in the top toolbar.
Within the Alert Logs, you can review each triggered alert’s details, including the time of activation, the specific condition that was met, and any relevant data regarding the indicator and price level. This log acts as a comprehensive diary of your alert activities, allowing you to analyze the effectiveness of your custom alerts and refine your trading strategies accordingly.
By regularly reviewing the Alert Logs, you can gain valuable insights into the accuracy and efficiency of your alerts, enabling you to make informed decisions and improve your trading performance over time.
In conclusion, the Alert Logs section is a valuable tool that complements custom alerts, providing an organized and transparent record of your trading activities. Combining the power of custom alerts with the insights gained from the Alert Logs section, you can elevate your trading endeavors and achieve a deeper understanding of market dynamics. So, take advantage of this feature, fine-tune your custom alerts, and let TradingView be your trusted ally in navigating the ever-changing financial markets. Happy trading!
Custom alerts are powerful tools that can help you stay on top of your trading game. By carefully setting up the right conditions based on chosen indicators, timeframes, and selecting suitable notification options, you can receive timely updates on potential trade opportunities without being glued to your screen all day.
Experiment with different combinations and see what works best for your trading style. Remember that the markets are dynamic, and staying adaptable is key to successful trading. Good luck, and may your custom alerts lead you to prosperous trading ventures! Happy trading!