
A Guide to Enabling Auto-Trading from a Webhook on MetaTrader 4 / 5
MetaTrader 4 (MT4) is a popular platform among forex traders, known for its advanced trading capabilities and customizable features. One powerful functionality it offers is the ability to enable auto-trading using webhooks. This means you can automate your trading strategies based on signals received from an external source. In this guide, we’ll walk you through the process of setting up auto-trading from a webhook on MetaTrader 4.
Step 1: Configuring the Expert Advisor (EA)

An Expert Advisor (EA) is a script that can automate trading operations on MT4. To start, you’ll need to create or acquire an EA that can process webhook data and execute trades accordingly. Here’s how to do it:
- Open MetaEditor from the MT4 platform.
- Create a new EA by selecting “File” > “New” > “Expert Advisor (template)”.
- Write or import the necessary code to handle the incoming webhook data. This might include parsing the data and executing trades based on predefined conditions.
- Compile the EA by clicking the “Compile” button in MetaEditor.
- If you are using a Webhook provider such as TradingView.to you can download their specific EA https://tradingview.to.
Step 2: Allowing DLL Imports
Webhooks often involve sending and receiving data to/from external sources, which might require dynamic link library (DLL) imports. Here’s how to enable DLL imports:
- In MetaTrader 4, go to “Tools” > “Options”.
- In the “Expert Advisors” tab, check the box that says “Allow DLL imports”.
- Click “OK” to save the changes.
Step 3: Specifying URL Connections in the Allowed URL List
To receive webhook data, you’ll need to specify the URLs of the sources you trust. Here’s how to do it:
- In MetaTrader 4, go to “Tools” > “Options”.
- In the “Expert Advisors” tab, navigate to the “Allowed URL” section.
- Add the URLs of the sources you’ll be receiving webhooks from. Make sure these are secure and reputable sources to prevent potential security risks.
- Click “OK” to save the changes.
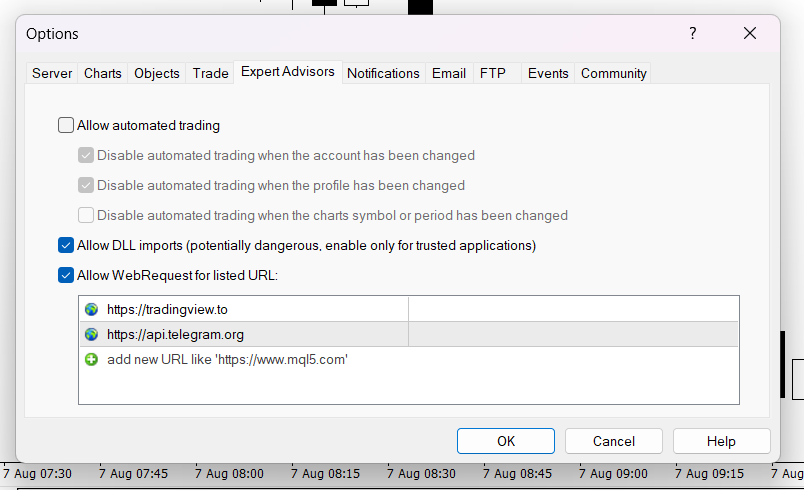
URL List for TradingViewToAnywhere:
Step 4: Turning on Auto-Trade
Enabling auto-trading will allow the EA to execute trades automatically based on the signals received from the webhook. Here’s how to do it:
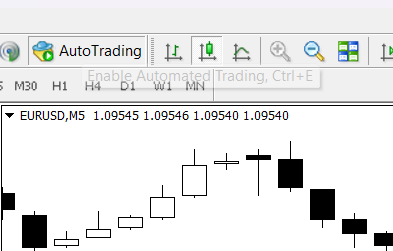
- Open the MT4 platform.
- In the upper toolbar, find and click the “Auto Trading” button to enable it. This will turn the button green, indicating that auto-trading is active.
- Attach your configured EA to the chart of the trading instrument you want to trade.
Step 5: Testing and Monitoring
Before deploying your auto-trading system in a live environment, it’s crucial to thoroughly test it using a demo account. Monitor its performance and make any necessary adjustments to your EA and trading strategy based on the test results.
Remember that automated trading involves risk, and it’s important to understand the implications of using an EA to execute trades on your behalf. Always exercise caution and ensure you have a solid understanding of the trading strategy your EA is implementing.
In conclusion, enabling auto-trading from a webhook on MetaTrader 4 can streamline your trading process and allow you to take advantage of automated trading strategies. By configuring the Expert Advisor, allowing DLL imports, specifying trusted URLs, and turning on the auto-trade function, you can harness the power of webhooks to enhance your trading experience. Just remember to test thoroughly and stay informed about the risks involved in automated trading.
